Navigation: General Company Settings >
Email Templates


|
Navigation: General Company Settings > Email Templates |
  
|
You can use the flexible tool of Email Templates to customize messages resulting from Company Web Portal Transaction activity. You can design very precise and clear messages using the Templates. See below for an example of actual emails transmitted using a fully-formatted Template.
An Active Email Template is required for Email Notification.
Setting up an Email Template:
| • | On the Work Menu at the top of the screen, click the System down-arrow, and select Email Templates. |
| • | The smaller-size Lookup screen will appear. (To add or change a record, see Small Lookup, Add or Edit.) |
| • | Next, the Email Template Details screen will appear. This screen has a second Tab for Notes. |

Header:
Template Name:
Give a short, meaningful title allowing you to select Templates from the Small Lookup, Add or Edit
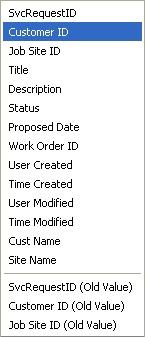
When you click on this button a drop-down box appears allowing you to select a data variable for the portion of the Template you are currently filling in.
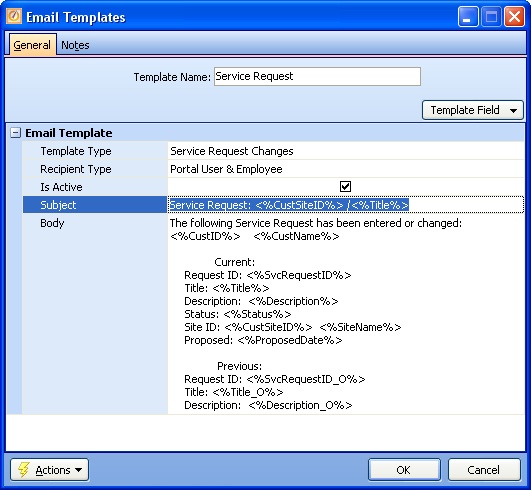
In the example above, the data variable for Customer Name is: <%CustName%>. This is used in the second line of the Body of the Template.

Note that when using these data variables you can design the layout around the variables. You can intersperse spacing, start new lines, and insert other text, to create a good design for the resulting email. Look at the example screen above:
| • | The Subject field contains some spaces and a slash separating the data variables. |
| • | The Body field contains considerable formatting, using descriptive text titles and spaces to make the data more clear and informative. |
For example, you may be filling in the Subject field and wish to show the variable for the "Title" of the Service Request.
| 1. | Place your cursor in the Subject field on the Template. |
| 2. | Click the Template Field button. |
| 3. | Click to select the variable called "Title" from the Template Fields. |
| 4. | The data variable name will then appear in the Subject line here as < %Title% >. |
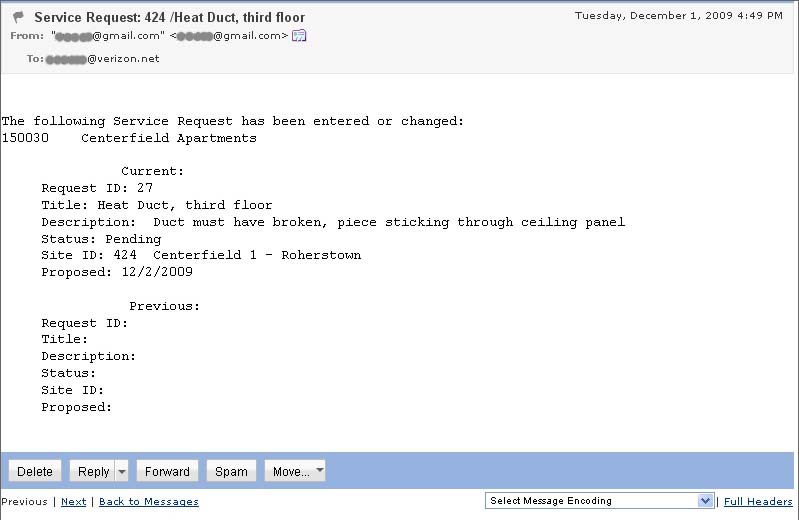
| 5. | The specific value of the "Title" - such as "Heat Duct, third floor" - will appear in the actual email that is sent. (See Example below.) |
Fields: (For help with data entry, see Field Select Boxes and Field Helpers.)
You can create Email Templates for the following Portal Transactions:
| 1. | Service Request Changes (Add and Update) |
| 2. | New Portal Notes - Notes for both Service Requests and Work Orders: |
| • | added by Customer Portal Users directly into the Web Portal |
| • | added by your staff in the Feedback Tabs for Service Requests and Work Orders |
Select from Simple Lookup Box:
| • | Employee - Any and all Employees with the Email Notification flag set on |
| • | Portal User - Any and all Portal Users for the given Customer with the with the Email Notification flag set on |
Is Active:
The default for this flag is to be Active. Only one version of a Template Type can be active at one time. This flag allows you to inactivate and keep certain versions and choose which formats to use.
Subject:
Whatever is formatted here will become the Subject Line of the actual email. Note that by using the Template Field button you can mix data variables and constant text. (See Example below.)
Body:
Drop-down text field allows you to enter a large amount of information for the main message of the email. Whatever is formatted here will become the Body of the actual email. Note that by using the Template Field button you can mix data variables and constant text. (See Example below.)
Example of Email using Template:
Here is an example an actual email sent using the Template for a Service Request Change.
As you look at the sample email below, refer to the Sample Template above to see where data variables have been inserted and where text has been formatted around them. Note both the Subject and the Body of the email:

Page url: http://www.fieldone.com/startech/help/index.html?_email_templates.htm