Navigation: Basic Working Procedures > Customer Payments >
Display the Customer Payment Screen


|
Navigation: Basic Working Procedures > Customer Payments > Display the Customer Payment Screen |
  
|
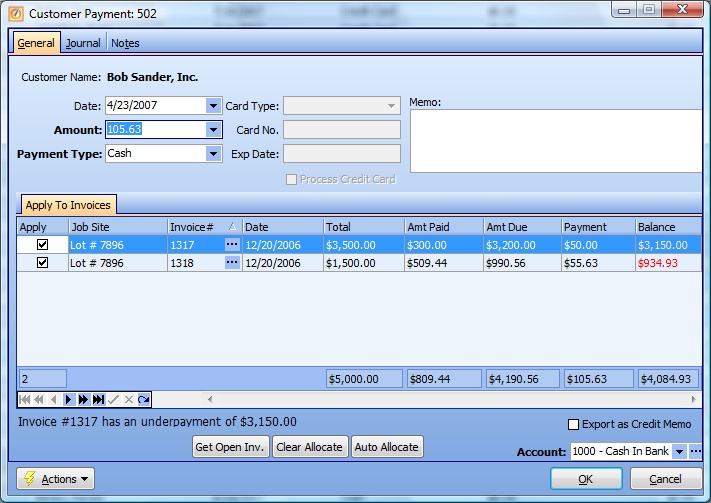
The Customer Payment Screen is divided into two sections:

This screen, with multiple details, is a DataView, where you can adjust the layout, print or export the data (see DataView Menu). There may also be a header panel above for the "parent" of the details, or a DataView Footer below. By using the Field Chooser function you may be able to add more fields to the display from the Customization Screen.
Entries in Payment Information for the Customer will supply the defaults for a new Payment header. You can change those values as you work here.
Amount:
The original Amount identified for this Payment that is being saved on record. (Generally should not be changed unless there was a mistake. For new or different Payment Amounts, create a new Payment.) All Payments from a Customer are saved, to keep a history, and can be viewed in the Payments Lookup screen.
Required. Selection from the lookup-box to specify the method of payment.
| ► | When Check is selected the Check No field will be displayed. |
| ► | When Credit is selected the Export as Credit Memo check-box at the bottom of the screen will also be automatically checked. You can de-select this flag. (See Create a Credit Memo for explanation of this check-box in relation to QuickBooks.) |
Note that Credit Memos are created here, with a Payment, and not through Invoicing. This allows you freedom in distributing the Payment Amount of the Credit Memo to the Customer's account.
| ► | When Credit Card is selected then all the available credit card fields will be activated using defaults from the Customer Payment Information Tab. You can also directly key the Credit Card Number in here, if you do not plan to Swipe the Credit Card. |
| ► | You also have the option to Swipe the Credit Card directly from within the Customer Payment screen. (This feature must be enabled in your license. For questions, contact the FieldOne Systems, LLC. Sales Department: sales@fieldone.com.) |
| • | All open Invoices are listed as details in DataView form on the Customer Payment screen. |
Tip: This can be very helpful if the Customer has many Job Sites and the Payment only applies to Invoices related to one Job Site. Just click the down-arrow in the Job Site Column Header and you will see a list of Job Sites on the Invoices for this Customer. Then you can select (or Start Filter Logic in the DataView) for the Job Site related to this Payment. That's the "power of the DataView."
| • | Detail Lines: |
| ► | Click on the Ellipsis button (…) in the Invoice # field to open and review the Invoice |
| ► | Use the Apply check-box to select one or more Invoice details to apply Payment. |
| ► | For Partial Payment of an individual Invoice, change the default Payment Amount in the detail line. |
| • | Buttons: |
| ► | To refresh the list of open Invoices, click the Get Open Inv. button at the bottom left of the screen. This will re-load all open Invoices for the Customer. |
| ► | Use the Auto Allocate button at the bottom to apply the entire Payment Amount automatically from the oldest Invoice to the most recent, until all money in the Payment has been used up. |
| ► | Use the Clear Allocate button at the bottom to clear all check-boxes and start over again with distributing the Payment Amount in the header of the screen. |
| • | Notification Messages at Bottom Left: |
| ► | As you work with the Invoice Detail lines, at the bottom left of the screen the Total Unapplied Amount of the Payment Amount keeps changing to show you the remaining amount of money to apply. |
| ► | If the Total Unapplied Amount is not sufficient to cover a selected Invoice, this automatically becomes a Partial Payment and fills the available remainder into the Payment Amount field of the selected Invoice detail line. |
| ► | When a Partial Payment is first displayed or you select its Invoice detail line, a notification message will appear at the bottom left of the screen saying that this Invoice has an underpayment. |
G/L Accounts for Export to Quickbooks:
When you create a Payment that will be exported to QuickBooks, the default value in the Account lookup-box at the bottom right of the screen will be the Undeposited Funds account in Quickbooks. This allows you to create a bank deposit directly from Payments recorded in FieldOne.
In some cases, however, you may need to identify a different account in Quickbooks. In that case, use the Account Number lookup-box at the bottom right of the screen to select a more appropriate G/L Account for the export. (See Lookup Combo Box. To add an entry, click the Ellipsis button (…) and select New.)
Page url: http://www.fieldone.com/startech/help/index.html?_customer_payments_display_payment_screen_.htm