Navigation: Basic Working Procedures > Customers and Job Sites > Job Sites > Display the Job Site Details Screen >
General Tab


|
Navigation: Basic Working Procedures > Customers and Job Sites > Job Sites > Display the Job Site Details Screen > General Tab |
  
|
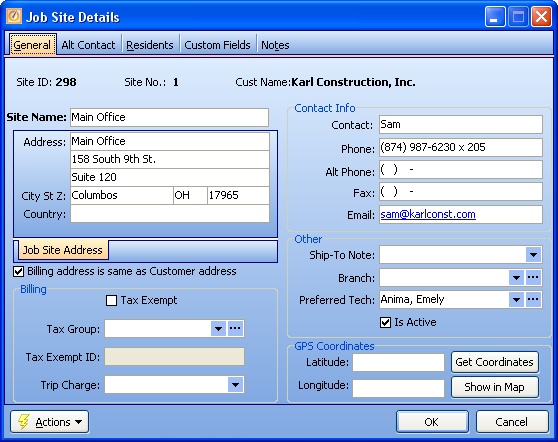
The General Tab contains the information which identifies this Job Site.
On this tab you enter all address and contact information for the physical location where your Technicians do work. For instance, for a corporate customer this might be "Main Branch" or "Warehouse." For a residential customer this might be "Winter House" or "Summer House," unless the work Job Site is the same as the Customer Billing Address.

A Full-Page screen like this one collects information about a single item. It may have one or several panels of information, perhaps using Hide-Show Icons to control whether you see or hide a panel, and Plus and Minus Sign Icons to expand or condense groups of related fields.
Fields: (For help with data entry, see Field Select Boxes and Field Helpers.)
Site Identification:
Site Name:
This is the default name used when looking for a Job Site.
Note: the Site Names used must be unique within each customer.
Site Address fields:
Tip: In order to make use of Mapping, always record the street address on the second line of the address field. Extra information such as the apartment / suite number can go on the third line of the address field.
Billing Address same as Customer address:
For a detailed description of this Select Box, please see Different Billing Address.
Billing Information:
When you check the Select Box to make this Job Site Tax Exempt, by default all its Work Orders will be tax exempt.
Note: When you make this selection, the Tax Exempt ID field opens for you to make an entry.
Tax Group:
If taxable, the Tax Group to be used for this Job Site. (See Lookup Combo Box. To add an entry, click the Ellipsis button (…) and select New.)
An optional amount that will automatically be charged whenever you report Labor for Service Calls to this Job Site. (Click down-arrow for Calculator Pad to aid numeric entry.)
Note: Labor Rates also allow Initial Charges for visits. What you enter here should relate specifically to extra costs for this Job Site.
Contact Information:
Contact:
The name or title of the primary person to access for this Job Site.
Phone, Alt. Phone, Fax, Web Site, Email:
Enter as many of the above as you need. The Alt Contacts Tab allows you to enter additional persons.
Other:
Ship-To Note:
An optional note that displays when you enter a Purchase Order for this Job Site.
The Company Branch to which all transactions associated with this Job Site belong. (See Lookup Combo Box. To add an entry, click the Ellipsis button (…) and select New.)
Preferred Tech:
The Technician whom either you or your client prefer to have perform any service calls for this Job Site. This choice will appear as the Preferred Technician in the Other fields on the Work Order General Tab. (See Lookup Combo Box. To add an entry, click the Ellipsis button (…) and select New.)
Is Active:
This Select Box indicates whether the Job Site is currently active. Inactive Job Sites do not show up (by default) on Lookup screens.
Note: To inactivate a Job Site, it must have no Work Orders that are In-Process and no open Invoices.
GPS Coordinates:
Latitude and Longitude:
Geographic coordinates used in various Mapping functions. For some functions such as Driving Directions and Technician Routing these are supplied automatically by Google™. However, for others, such as Route Assistant, the GeoCodes are required in the entry itself.
Get Coordinates:
Use this button to automatically insert the GPS Coordinates for both Latitude and Longitude, after you have entered complete information in the address fields.
Show in Map:
This button calls up a map powered by Google™ where you can verify that the address and its GPS Coordinates are working or just quickly get a view of where this set of GPS Coordinates is located.
Page url: http://www.fieldone.com/startech/help/index.html?_job_sites_screen_job_site_general_tab_.htm