Navigation: General Company Settings >
Company Branches


|
Navigation: General Company Settings > Company Branches |
  
|
You can set up multiple Company Branches. Some Companies depend heavily on Branches (or Divisions) to classify their work and their reporting and generally manage their Employees, Work Orders, Schedules, and Profit and Loss.
Here we show the source of Company Branch which appears in end-result history transactions:
Contains Branch |
1st Default from |
2nd Default, if any |
Useful for |
|
|||
(Manual) |
Warranties |
||
Assigned - Employee |
Unassigned - Logon User ID |
|
|
(Manual) |
(Manual) |
|
|
|
|||
(Manual) |
(Manual) |
|
|
(Manual) |
|
||
in Company Branch here |
|
export to QB Classes |
|
|
Setting up a Company Branch:
| • | On the Work Menu at the top of the screen, click the System down-arrow, and select Company Branches. |
| • | The smaller-size Lookup screen will appear. (To add or change a record, see Small Lookup, Add or Edit.) |
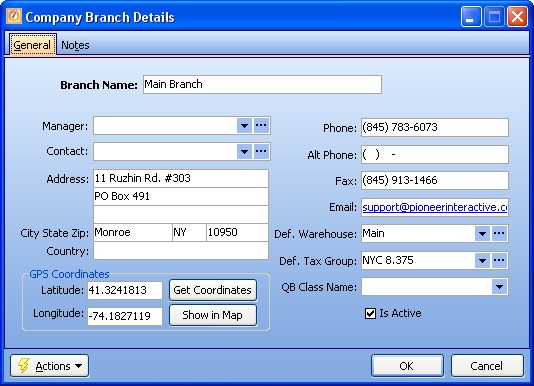
| • | Next, the Company Branch Details screen will appear. This screen has a second Tab for Notes. |

Fields: (For help with data entry, see Field Select Boxes and Field Helpers.)
Left Side:
Required. Short descriptive name to identify the Branch, such as would be used in mailing address.
Manager:
The Employee who is Manager of this Branch. (See Lookup Combo Box. To add an entry, click the Ellipsis button (…) and select New.)
Contact:
The Employee assigned as the Contact person for this Branch. (See Lookup Combo Box. To add an entry, click the Ellipsis button (…) and select New.)
Address:
The mailing and Ship-To address for this Branch. Be sure to use an address accurate enough for Mapping functions, such as Technician Routing, and for shipping, such as for Purchase Orders.
Tip: In order to make use of Mapping, always record the street address on the second line of the address field. Extra information such as the apartment / suite number can go on the third line of the address field.
GPS Coordinates:
Latitude and Longitude:
Geographic coordinates used in various Mapping functions. For some functions such as Driving Directions and Technician Routing these are supplied automatically by Google™. However, for others, such as Route Assistant, the GeoCodes are required in the entry itself.
Get Coordinates:
Use this button to automatically insert the GPS Coordinates for both Latitude and Longitude, after you have entered complete information in the address fields.
Show in Map:
This button calls up a map powered by Google™ where you can verify that the address and its GPS Coordinates are working or just quickly get a view of where this set of GPS Coordinates is located.
Right Side:
Phone, Alt. Phone, Fax, Web Site, Email:
Enter as many of the above as you need.
Default Warehouse:
The main Warehouse assigned for this Branch. (See Lookup Combo Box. To add an entry, click the Ellipsis button (…) and select New.)
Default Tax Group:
If taxable, the Tax Group to be used for this Branch. (See Lookup Combo Box. To add an entry, click the Ellipsis button (…) and select New.)
Optional - enter a QuickBooks Class Name here to direct the Accounting Integration Export to group historical transactions into a Quickbooks Class for this Branch.
Is Active:
Use the checkbox to indicate currently used by your Company. If you later remove the check-mark making this field Inactive, this entry will still show on older records where it has already been used, but will not be available for use in the future.
The default for the Lookup screen is to show Only Active records. You can remove the check-mark from the select-box on that screen and view all.
When complete:
Click OK to save your entries and exit the screen.
Page url: http://www.fieldone.com/startech/help/index.html?_company_branches_.htm