Navigation: Basic Working Procedures > Customer Equipment > Display the Customer Equipment Screen >
General Tab


|
Navigation: Basic Working Procedures > Customer Equipment > Display the Customer Equipment Screen > General Tab |
  
|
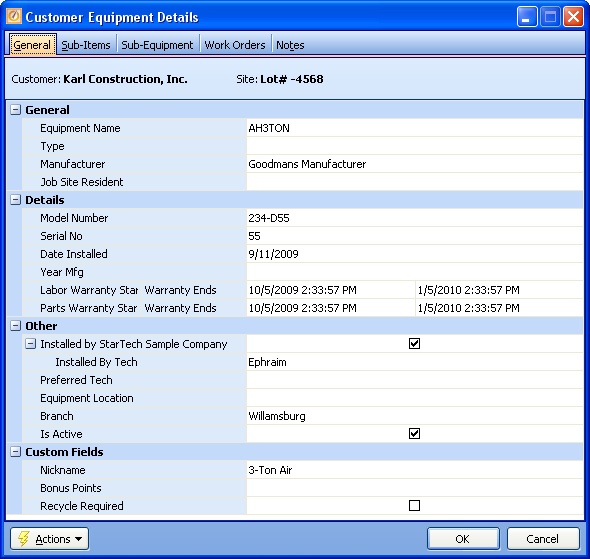
The General Tab contains the information which identifies this piece of Customer Equipment. If the Equipment was created using the Auto-convert flag from a related Part which has now been installed, this tab contains all the information from the transfer.

A Full-Page screen like this one collects information about a single item. It may have one or several panels of information, perhaps using Hide-Show Icons to control whether you see or hide a panel, and Plus and Minus Sign Icons to expand or condense groups of related fields.
This screen consists of four separate panels, identified by the headings as the fields are described below.
| • | Custom Fields - if any (See Company Preferences, Custom Fields.) |
Fields: (For help with data entry, see Field Select Boxes and Field Helpers.)
Equipment name:
Required. Any name that best identifies the Equipment, for instance, "Bedroom A/C System" or "Basement A/C System."
Type:
Categorizes the Equipment Type. (See Lookup Combo Box. To add an entry, click the Ellipsis button (…) and select New.)
Identifies the Manufacturer who produced the Equipment (not the Vendor who supplied it). (See Lookup Combo Box. To add an entry, click the Ellipsis button (…) and select New.)
Job Site Resident:
Identifies the Resident Unit (if any) where the Equipment is located at this Job Site. (See Lookup Combo Box. To add an entry, click the Ellipsis button (…) and select New.)
Model Number:
The Model Number of the equipment. This is a number of digits and/or letters that describes the "version" or type of the Equipment. (The Serial Number identifies the unique item.) This information is mandatory when ordering any parts for Equipment.
Serial Number:
The unique identifier (if any) on a piece of Equipment. This number is a number of digits and/or letters. If it exists for this item, then it is usually required when corresponding with the Manufacturer and for warranties.
Date Installed:
The date when the Equipment was actually installed.
Year Manufactured:
The year when the equipment was manufactured. This will help you keep track of whether the Equipment is still within the Manufacturer's warranty period.
Labor Warranty Start/End Dates:
The Start and End Dates for the Labor Warranty on this piece of Equipment, if any. For Parts using the Auto-convert flag to transfer items to Customer Equipment, these dates are automatically calculated, using the Invoice Date. You can enter or change this information. (See Calendar Helper.)
Parts Warranty Start/End Dates:
The Start and End Dates for the Parts Warranty on this piece of Equipment, if any. For Parts using the Auto-convert flag to transfer items to Customer Equipment, these dates are automatically calculated, using the Invoice Date. You can enter or change this information. (See Calendar Helper.)
Installed by (your Company):
If the Equipment was installed by your firm, select this check-box. Otherwise, uncheck the box. (The box defaults to selected.)
Installed by Tech appears if Installed by (your Company) is selected. Enter your selection from the lookup-box for the Technician who did the installation.
Note: The lookup-box list includes all Employees checked off as Technician in the Employee Details Tab, which you must change in order to display a new Technician.
Installed by Vendor appears if Installed by (your Company) is not selected - for the Vendor who did the installation. (See Lookup Combo Box. To add an entry, click the Ellipsis button (…) and select New.)
Preferred Technician:
Identifies the Technician best suited to work on this piece of Customer Equipment. Can be entered or changed here. Having a Preferred Technician can help when entering new Work Orders. (See Lookup Combo Box. To add an entry, click the Ellipsis button (…) and select New.)
Equipment Location:
Short description of where to find the installed Equipment (for instance, in the attic or closet).
Use this to indicate the Company Branch holding the Warranty. Default comes from the Logon User ID entering the record, if any. (See Lookup Combo Box. To add an entry, click the Ellipsis button (…) and select New.)
Is Active:
Use the check-box to indicate currently used by your Company. If you later remove the check-mark making this field Inactive, this entry will still show on older records where it has already been used, but will not be available for use in the future.
The default for the Lookup screen is to show Only Active records. You can remove the check-mark from the select-box on that screen and view all.
See Company Preferences, Custom Fields, for more explanation. If you set these up for Parts, and use the Parts Auto-convert flag to transfer to Customer Equipment, Custom Fields are brought over, so there should be identical Custom Fields created for Equipment also.
Page url: http://www.fieldone.com/startech/help/index.html?_cust_equip_screen_general_tab_.htm