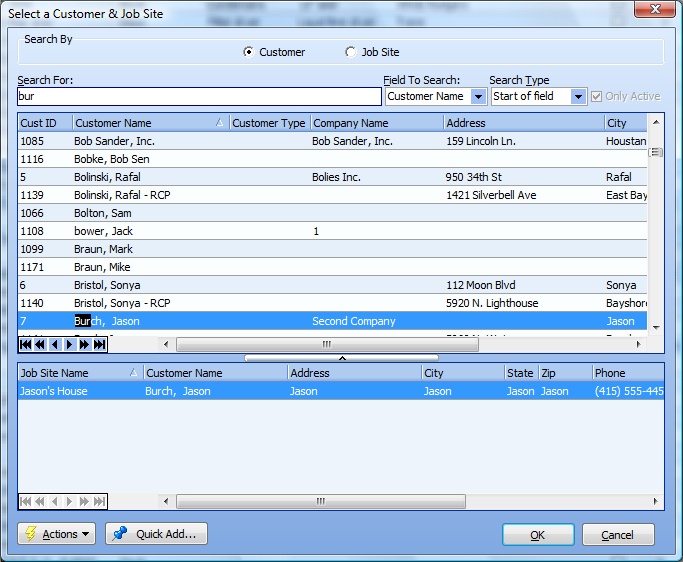
When creating various items (e.g. Service Calls, Projects, Equipment) you are prompted with the Select a Customer & Job Site screen. The Actions button at the bottom left of this screen offers various Add functions for both new Customer and new Job Site, if needed.
On this screen you can easily search for existing entries or add new ones, even during the course of an incoming phone call. Since this screen uses powerful tools, it is worth a little time to learn how to get the full benefit from its search capabilities and select those which suit you best. However, you can start using it right away, intuitively.
This screen is divided into several panels. The Search By top panel controls the detail panel displays below. Click the Select Button to search by either Customer or Job Site.
| • | Search by Customer shows two DataView detail panels below: |
| • | Search by Job Site shows one panel below, the Job Site Panel |

This screen, with multiple details, is a DataView, where you can adjust the layout, print or export the data (see DataView Menu). There may also be a header panel above for the "parent" of the details, or a DataView Footer below. Usually you can use key-matching search on fields like ID Number.
Each of the 2 detail panels is a separate DataView and allows all the related search and filter and customize functions.
Use the Horizontal Scroll Bars to review all the fields available on each DataView. For instance, you may wish to use the Customer Phone Number.
Search by Customer:
| 1. | Make sure the Field to Search is set as you desire, from choices such as Customer ID, Customer Name, Customer Type, Company Name, and others. When you exit and reenter the screen, it will default to the last-used value. |
| 2. | To use Key-matching Search - start typing in the Search For field -- the more letters and numbers you enter, the more quickly the search lands on the item you are seeking |
| 3. | Using what you have typed in, the search will show highlighted results found in both panels below: |
| • | The closest Customer match for the search is highlighted in the Customer panel |
| • | Job Sites for that Customer are shown below in the Job Site panel, with the first highlighted |
| 4. | If the search results found both Customer and Job Site: |
| • | Verify your Customer selection. Keep the highlighted line or click on a Customer line close by. |
| • | Verify your Job Site selection. Keep the highlighted line or click on a Job Site line close by. |
| • | To continue with the transaction you were entering earlier: |
| ► | Click on the OK button (or press the Enter key on the keyboard) |
| ► | Or, double-click on a highlighted line, from either the Customer or the Job Site panel |
| 5. | If the search results found the desired Customer but you wish to add a new Job Site, click the Actions button at the bottom left and select an Action: |
| ► | New Job Site for Customer XYZ - full Job Site Details screen |
| ► | Quick Add Job Site for Customer XYZ - "shortcut" Job Site |

| 6. | If the search results show the Customer is not found: |
| ► | Select Quick Add Customer and Job Site. This is the fastest method with a "shortcut" Customer and "shortcut" Job Site both on the same screen. Note the Quick Add button: |

| ► | Select New Customer. This choice uses the full Customer Details screen. When you save and exit, the message that asks whether you wish to create a Job Site will take you to the full Job Site Details screen |
Search by Job Site:
| • | The choices you make for Search by Job Site, using the Job Site Panel, are similar to those described for the Search by Customer. |
| • | Once the search results show a highlighted line with both Customer and Job site, continue with the transaction you were entering earlier: |
| ► | Click on the OK button (or press the Enter key on the keyboard) |
| ► | Double-click on a highlighted line, from either the Customer or the Job Site panel |
| • | As with the Search by Customer, you can add either a Customer or a new Job Site, if needed. |
Page url: http://www.fieldone.com/startech/help/index.html?_customers_and_job_sites_select_screen_.htm


![]()