Navigation: Basic Working Procedures > Schedule Board > Perform Schedule Slot Tasks > Change Schedule Slot Details >
General Tab


|
Navigation: Basic Working Procedures > Schedule Board > Perform Schedule Slot Tasks > Change Schedule Slot Details > General Tab |
  
|
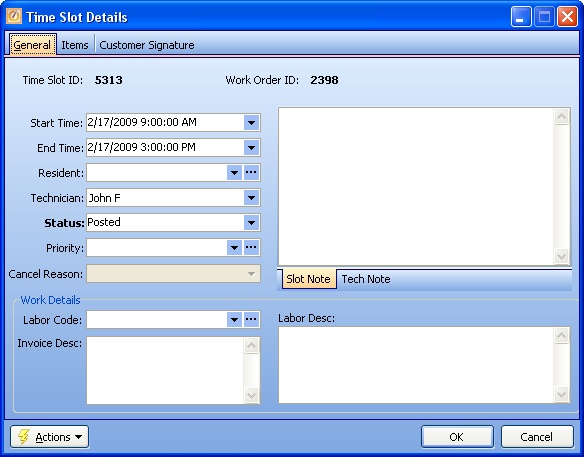
The General Tab contains the basic information regarding the work already planned for this individual Schedule Slot on the Schedule Board:
Here is a sample Time Slot Details screen, showing the General Tab:

Fields: (For help with data entry, see Field Select Boxes and Field Helpers.)
Start Time:
Shows the planned Start Time for this Schedule Slot. (See Calendar and Clock Helper.)
Note: Make sure when you change the Status of the Schedule Slot to In-Progress, Completed or Posted that you specify the actual time the work started, since this affects the Labor charges. (These entries can also be updated at Posting time.)
End Time:
Shows the planned End Time for this Schedule Slot. (See Calendar and Clock Helper.)
Note: Make sure when you change the Status of the Schedule Slot to Completed or Posted that you specify the actual time the work started and ended, since this affects the Labor charges. (These entries can also be updated at Posting time.)
Resident:
The Resident Unit (if any) where the work is done. (The default for this field is the default Resident from the Work Order Job Site.) (See Lookup Combo Box. To add an entry, click the Ellipsis button (…) and select New.)
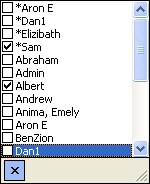
Shows the Technicians(s) and/or Crew(s) for this Schedule Slot. Employees are assigned as Technicians and Crew in the Employee Details Tab and Crew Tab. (See Simple Lookup Box for predefined selection.)
| • | Select Technicians by checking names that do not have an asterisk in the Lookup Box, choosing one or more individual workers for this Service Call. (A Crew Leader's name without an asterisk is treated as an individual Technician.) |
| • | Select a Crew by checking the asterisked name of a Crew leader. You can delete Crew members by de-selecting automatic checks beside Crew member names. |
| • | When you have selected Multiple Technicians and/or Crews, notice that a Schedule Slot for the Date and Time has been created for each Technician on the Schedule Board. |
TIP: When selecting Multiple Technicians and/or Crews, you may wish to adjust or switch the Layout View you are using for this Schedule Board, to make sure that all are visible.

If desired, use the Simple Lookup Box to select a predefined Schedule Slot Status.
If desired, select a Schedule Priority. (See Lookup Combo Box. To add an entry, click the Ellipsis button (…) and select New.)
Schedule Slot Note Tab:
Usually used for the internal office to communicate with the field Technicians any specific details about this schedule. (See also the Tech Note Tab below.) (See Helpers, Text Box with Spell Checker.)
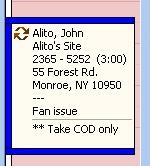
Note: Do NOT use this field to describe Problems the Customer is having. For that you use the Problem Tab of the Service Call. Here you enter notes that apply only to this Schedule Slot (e.g. "** Take COD only," or "Get key code before leaving office," etc.).
For example:

Tech Note Tab:
Usually used for the Technician to leave any notes for the internal office. (See also the Schedule Slot Note above.) (See Helpers, Text Box with Spell Checker.)
Again: Do NOT use this field to describe details that belong on the Problem Tab of the Service Call, or for anything that pertains to the repair, which properly belongs on the Labor Description below.
Labor Code:
Optional. The Labor Code showing the type of Labor performed. Be aware of how the chosen code fits into any Agreement or Customer Special Pricing. (For advanced work, see also Pricing Tablesthrough(See Lookup Combo Box. To add an entry, click the Ellipsis button (…) and select New.)
Invoice Description:
If you specify the Labor Code, the printed Invoice Description detail line will default to the Labor Code Description. You can override this if you wish the Customer to see something else on the printed Invoice.
Labor Description:
Shows technical details about the work to be done. This description field will not appear on the Customer Invoice, but is rather for internal discussion about the technical nature of the labor performed.
When completed:
Click OK to save the Schedule Slot.