Navigation: Basic Working Procedures > Purchase Management > Purchase Orders > Receive Purchase Order Items >
Display the PO Receipt Screen


|
Navigation: Basic Working Procedures > Purchase Management > Purchase Orders > Receive Purchase Order Items > Display the PO Receipt Screen |
  
|
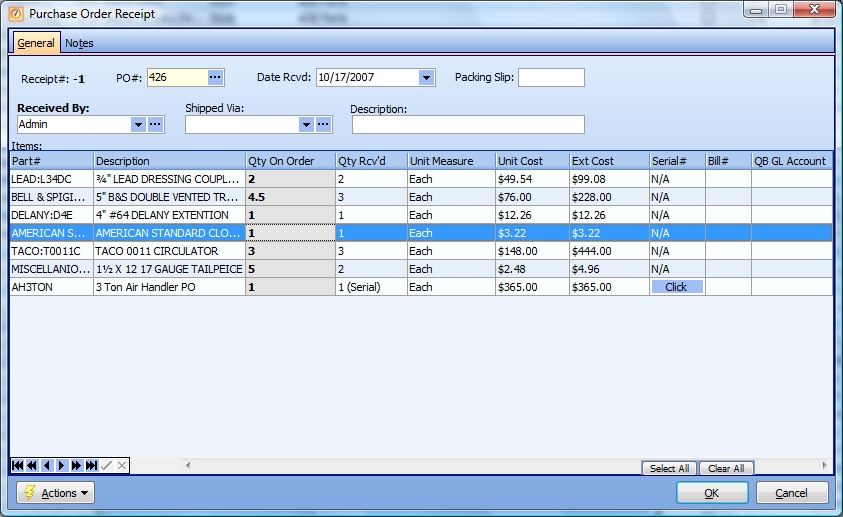
When you display it, the PO Receipt screen will list all Parts on the "parent" Purchase Order that you have not yet fully received. Then for any of those Parts you can enter the Qty Rcv'd in the current shipment.

This screen, with multiple details, is a DataView, where you can adjust the layout, print or export the data (see DataView Menu). There may also be a header panel above for the "parent" of the details, or a DataView Footer below. By using the Field Chooser function you may be able to add more fields to the display from the Customization Screen.
The Actions button at the lower left allows the Scan Parts option to enter Parts details quickly.
TIP: You can click the Select All button at the bottom of the window to set the Qty Rcv'd field the same as the Qty On Order for every Part detail line. Then you can go back and make changes for exceptions. Use this to save a lot of time, especially on large orders.
Fields: (For help with data entry, see Field Select Boxes and Field Helpers.)
Header:
Receipt #:
Protected. Unique identifying number generated when you save and enter this Receipt.
PO #:
Protected. Identifies the Purchase Order which this Receipt is attached to.
Date Received:
Required. Defaults to today's date. Use Calendar Helper for the date.
Packing Slip:
Optional, but sometimes very helpful in tracking deliveries and items.
Defaults to the User ID of the Employee who filled in this PO Receipt. You can change this.
Shipped via:
Describes the method of shipment. (See Lookup Combo Box. To add an entry, click the Ellipsis button (…) and select New.)
Description:
Optional. Use a short, descriptive title to help with the Lookup screen, etc.
Detail lines:
Part #:
Protected. If the item is a Parts Kit and the Generate Details on - Purchasing flag is selected, see how to enter PO Receipts for Parts Kits.
Qty Rcv'd:
The actual Quantity you have received for each part.
If this is a Serialized Part there will be a reminder in parentheses that you also need to fill the Serial Number field below.
Unit Measure:
Protected. Taken from the Purchase Order Unit of Measure for the part.
The actual Cost per part. Defaults to the Cost predicted when creating the Purchase Order.
The Cost coming in now from the Vendor may differ and you are allowed to change it. Also, noting the discrepancy here may lead you to contact the Vendor for resolution or correction before the Vendor Invoice arrives.
Note: The actual Cost from the Vendor will be finalized here for historical updating. If there is any change in Cost on the Vendor Bill, then the corresponding update will occur.
Extended Cost:
The Unit Cost and Extended Cost fields act in tandem. If Quantity is greater than one, then a Unit Cost entered will calculate the Extended Cost, and vice-versa, if an Extended Cost is entered, the Unit Cost will automatically be calculated.
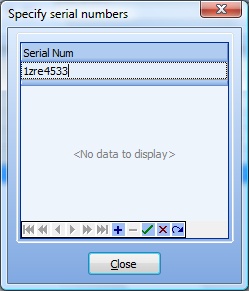
If this is a Serialized Part then a button with the caption Click will appear here. Click on the button to record multiple Serial Numbers and the Specify Serial Numbers screen will appear:

After you enter Serial Numbers, then click on the Close button. (You will need to open this screen again in order to view these Serial Numbers.)
When complete:
Click OK to exit the screen and save all your entries. In addition the Receipts Status changes to reflect your recent work:
| • | The detail Part Status on the Purchase Order, Parts Tab |
| ► | Partially Received |
| ► | Fully Received |
| • | The entire Purchase Order Status |
| ► | Partially Received |
| ► | Fully Received |
Page url: http://www.fieldone.com/startech/help/index.html?_purchmanage_poreceipts_display_screen_.htm